
Here’s a Chicken Kiev Recipe to Make This Timeless Dish At Home!
Looking for a classic, delicious chicken dish to make at home? Look no further than chicken kiev – sometimes known as chicken kyiv!
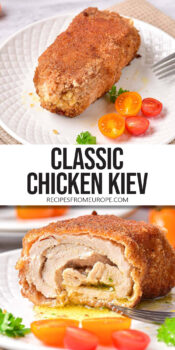
Thinly prepared chicken fillets are filled with garlic and herb butter, then rolled, breaded, fried, and baked to perfection.

While its exact origin is disputed, one theory is that chicken kiev originated in Russian or Ukraine sometime around the 19th and early 20th centuries.
The dish is said to have been influenced by “Haute cuisine” – the fancy, upscale preparation of dishes that Russian chefs borrowed from French cuisine.
Today, the dish remains popular in many former Soviet countries and other countries around the world. In Russia and Ukraine, the dish is typically known as Côtelette de volaille.
Ingredients
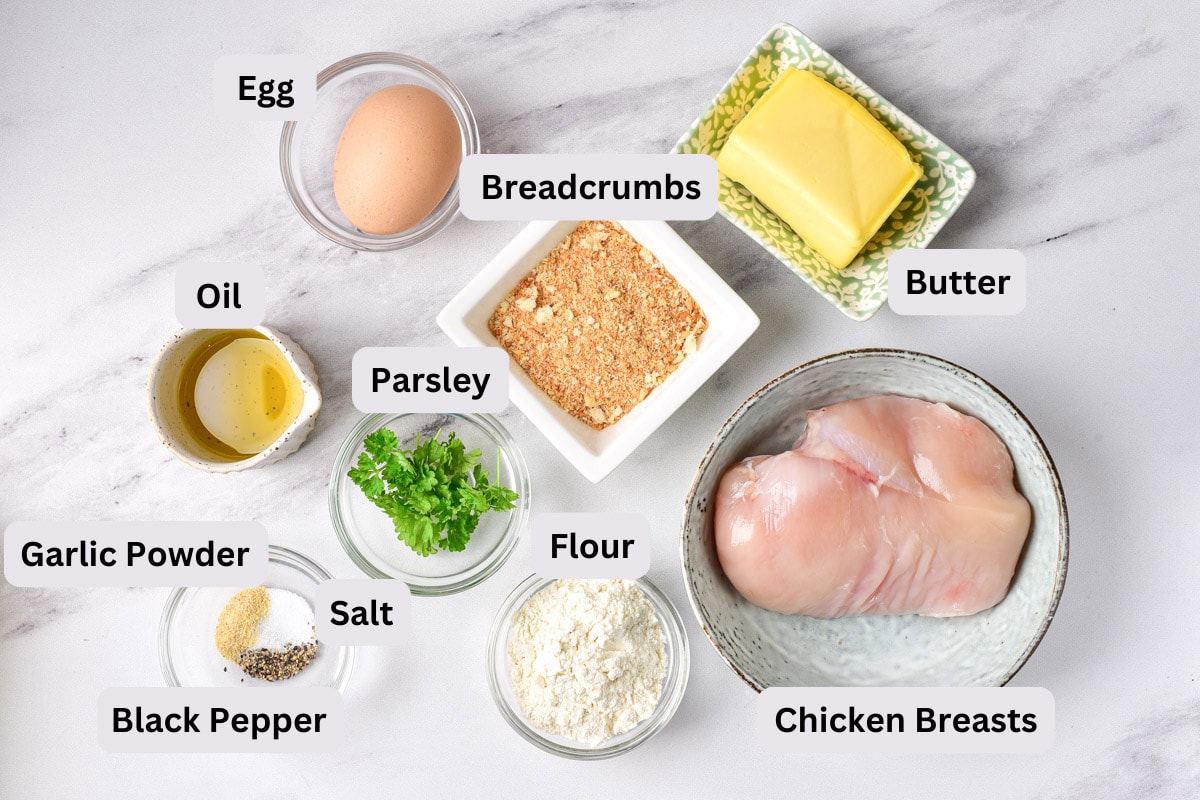
To make this recipe for chicken kiev, here are the ingredients that you will need. It’s actually not too many ingredients – but the preparation is what can take some time.
- Chicken breasts – 2 good quality skinless, boneless chicken breasts.
- Butter – Unsalted; to fill the chicken with. You can use salted butter, but then you may want to reduce the extra salt you add to the chicken.
- Parsley sprigs – For the filling.
- Egg – For breading the chicken.
- All-purpose flour – For breading the chicken.
- Breadcrumbs – For breading the chicken; use unflavored breadcrumbs. You could also use panko breadcrumbs.
- Salt – To season the chicken.
- Garlic Powder – To mix with the butter. You can also use fresh minced garlic instead of granulated garlic or garlic powder.
- Black pepper – To season the chicken.
- Cooking oil – To fry the chicken kiev.
Recipe Tips and Substitutions
Before you start making this classic dish, read through these recipe tips so that you know what to expect and there are no surprises once you get started!
- You can use store-bought breadcrumbs, but freshly baked, homemade breadcrumbs are best because they are fresh without any additional seasoning.
- You can make the butter with herbs and garlic ahead of time and freeze it or store it in the fridge for a couple of days. It’s easier to roll the chicken when the butter is hard.
- Instead of granulated garlic or garlic powder, you can add fresh minced garlic to the butter instead.
- Pound the chicken to a uniform thickness to ensure even cooking. However, be gentle since you don’t want to pound holes in the chicken breasts. And if you do go too far and ruin the chicken… you can always just make Sicheniki with them!
- Fry the chicken until golden brown, then transfer it to the oven to finish cooking for best results.
How to Make Chicken Kiev – Step by Step Instructions
This section is all about learning exactly how to make chicken kiev. We’ve included recipe process photos so you can follow along as you cook at home.
The recipe card with the cooking times and exact measurements for the ingredients is at the bottom of this post.

Start by preheating the oven to 375 degrees Fahrenheit.
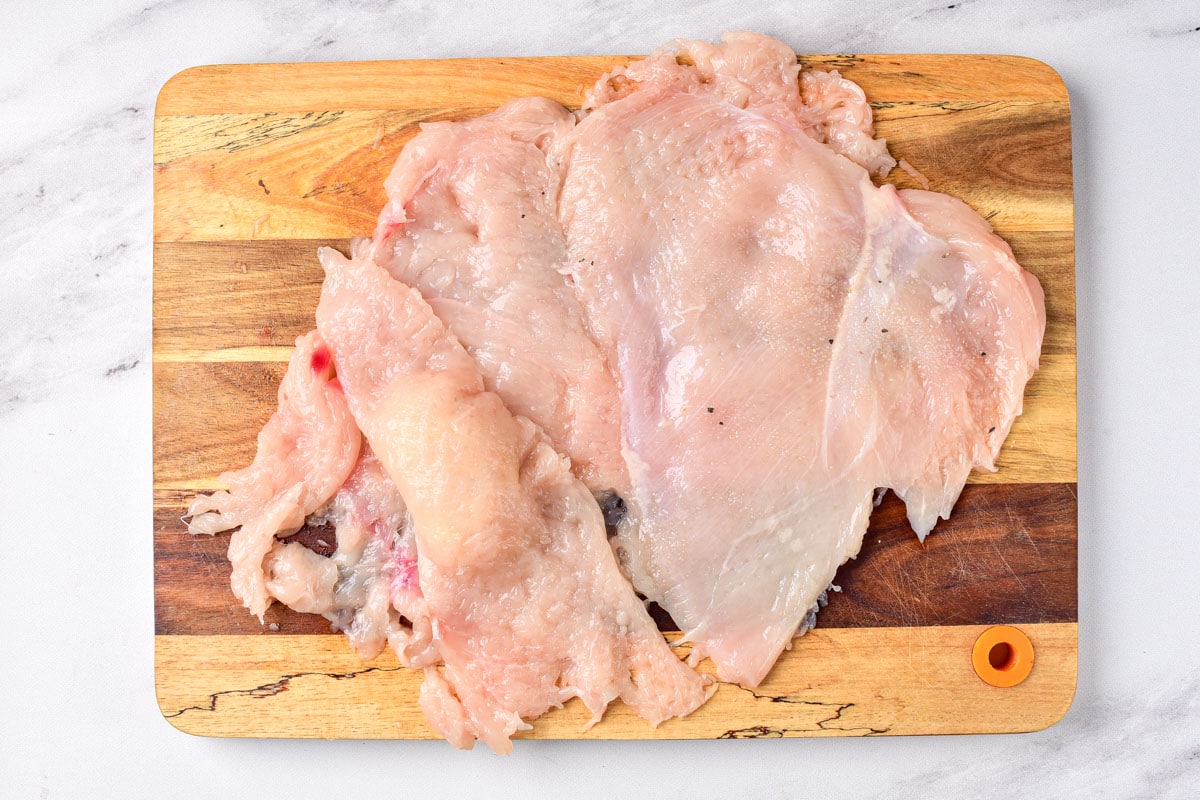
Using a sharp knife, fillet the chicken breasts (slice horizontally into two even pieces). Don’t cut all the way through, as you want to be able to “fold” it open.
Cut off a small end piece of the breast to use to cover the butter later.
Place the sliced chicken breasts on a cutting board and cover with plastic wrap. Gently pound each piece of chicken with a meat mallet to flatten further.
Make sure that the pieces of chicken have a uniform thickness and be gentle since you don’t want to pound holes in the chicken.
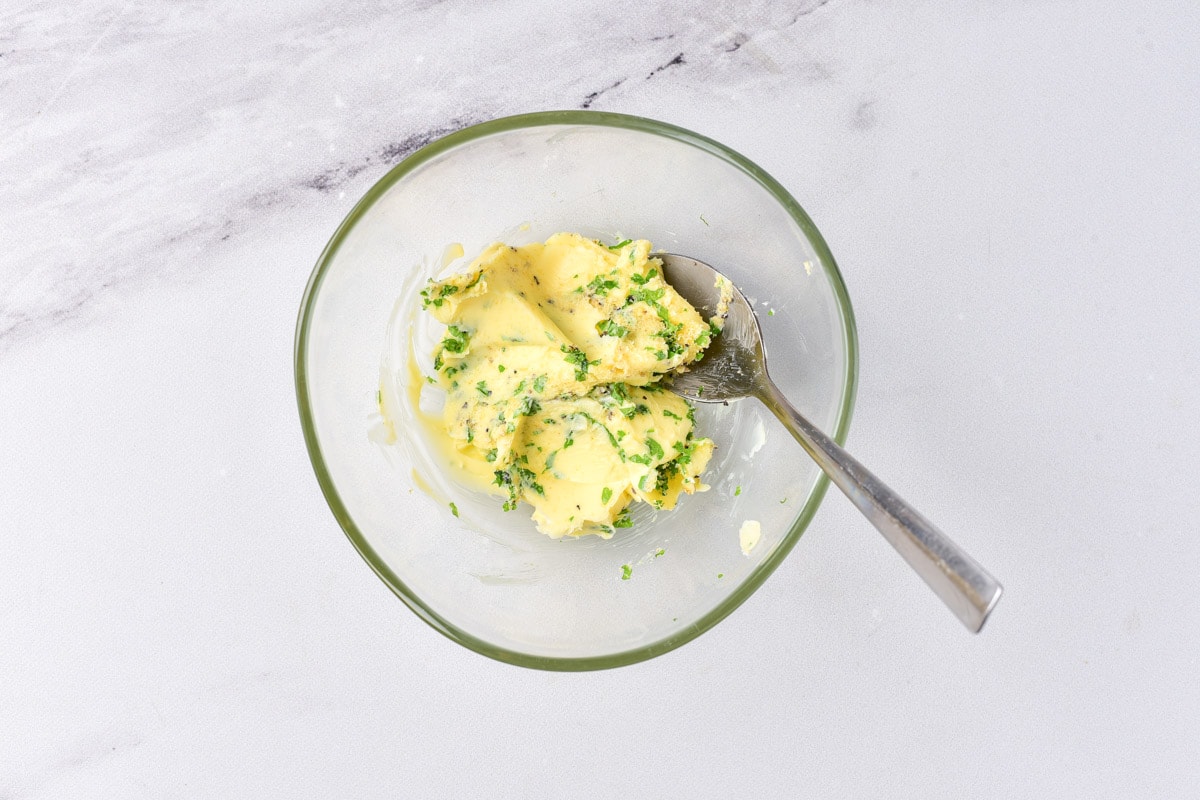
In a bowl, mix the softened butter with the chopped parsley and garlic. Shape the butter into a small block.
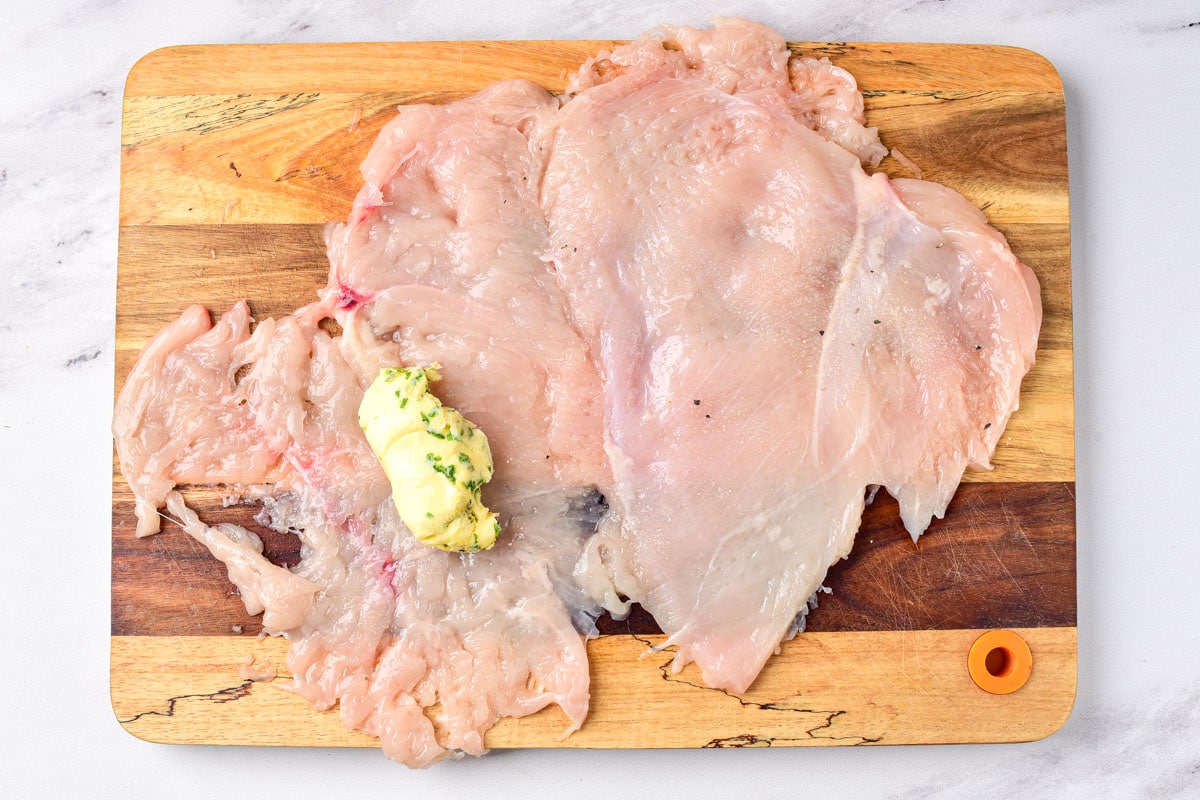
Salt and pepper the chicken. Place half of the butter on the edge of a flattened chicken breast.
Then place the small piece of chicken that you cut off earlier on top of the butter.

Now roll up the flattened chicken breasts tightly, starting on the side with the butter, tucking in the edges as you roll. Secure with skewers if necessary.
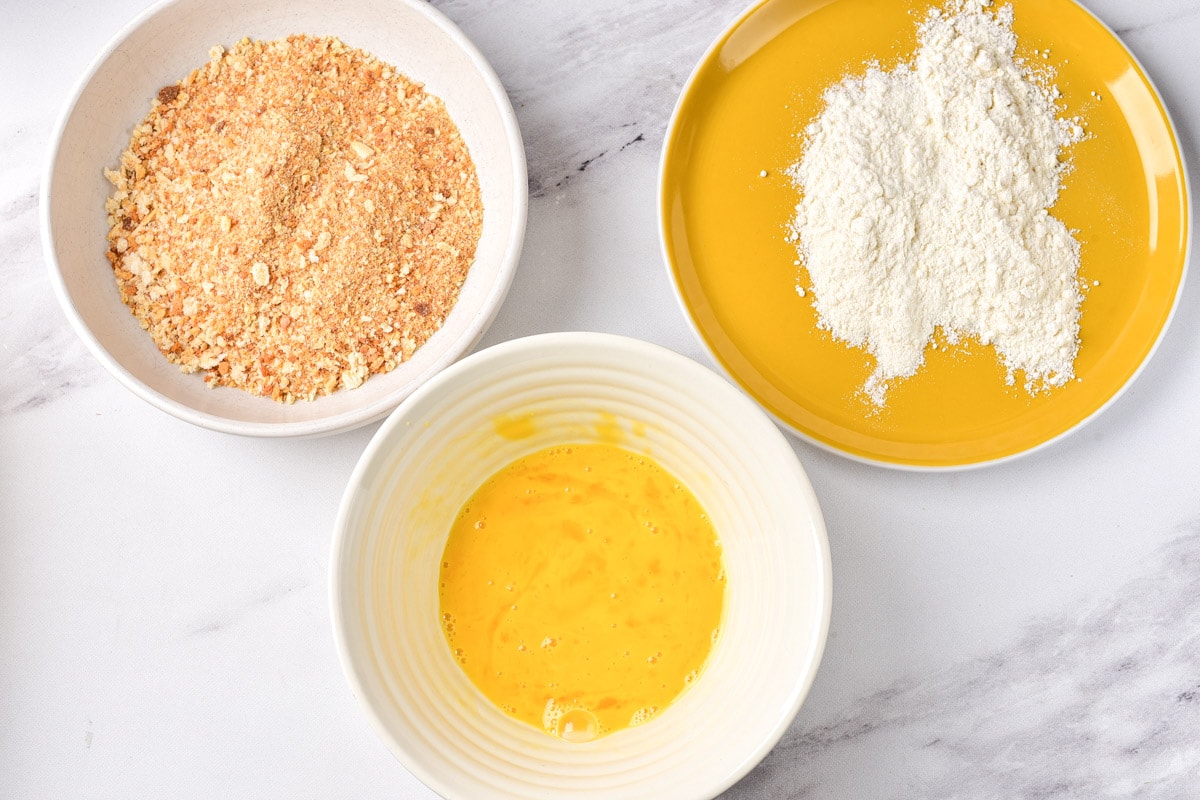
Pour breadcrumbs into one bowl, flour into another, and the beaten egg into a third.
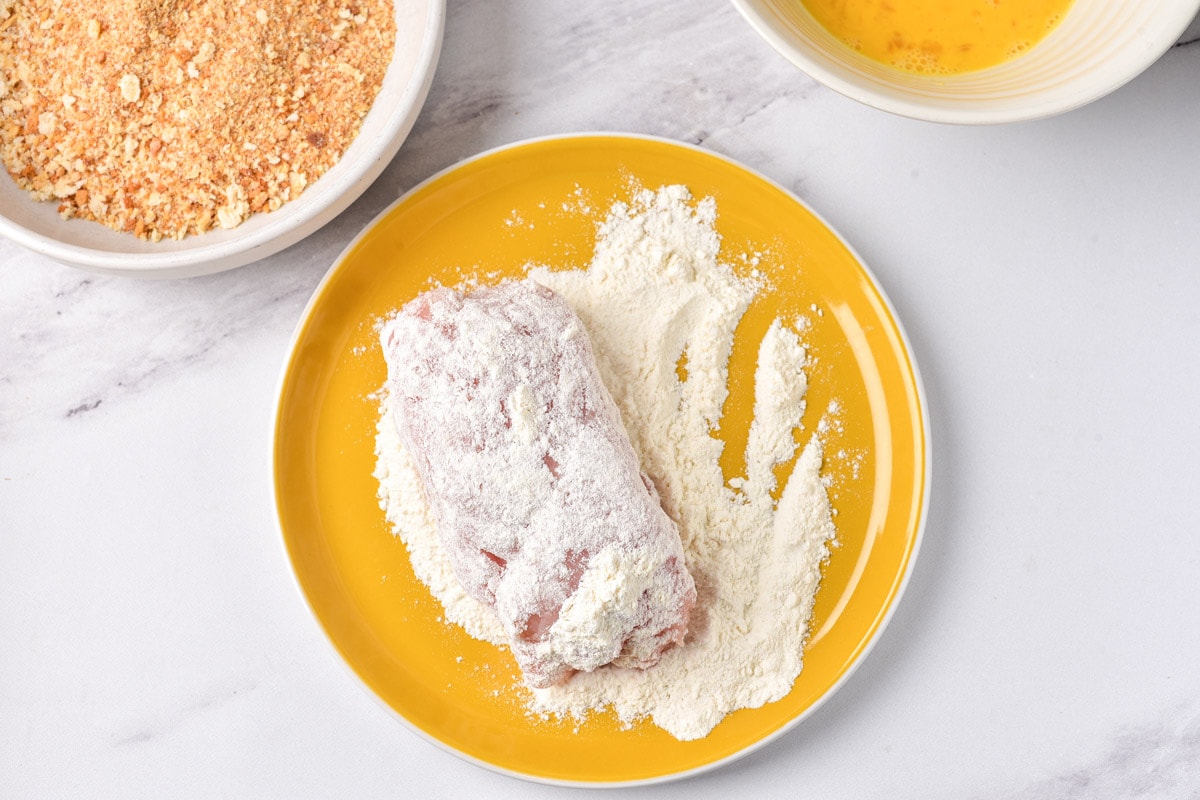
Dredge the chicken in the flour, then dip it in the beaten eggs.
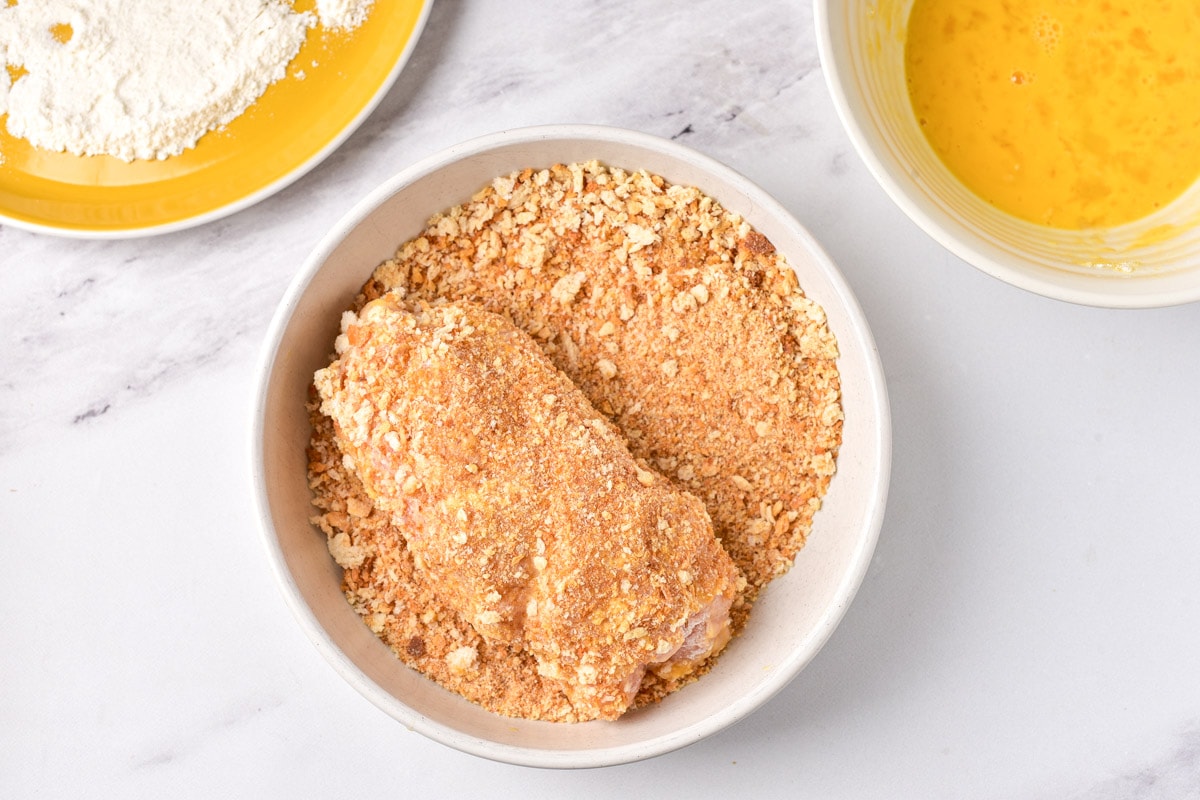
Roll the chicken in flour and egg again, then roll it around in the breadcrumbs until completely coated.
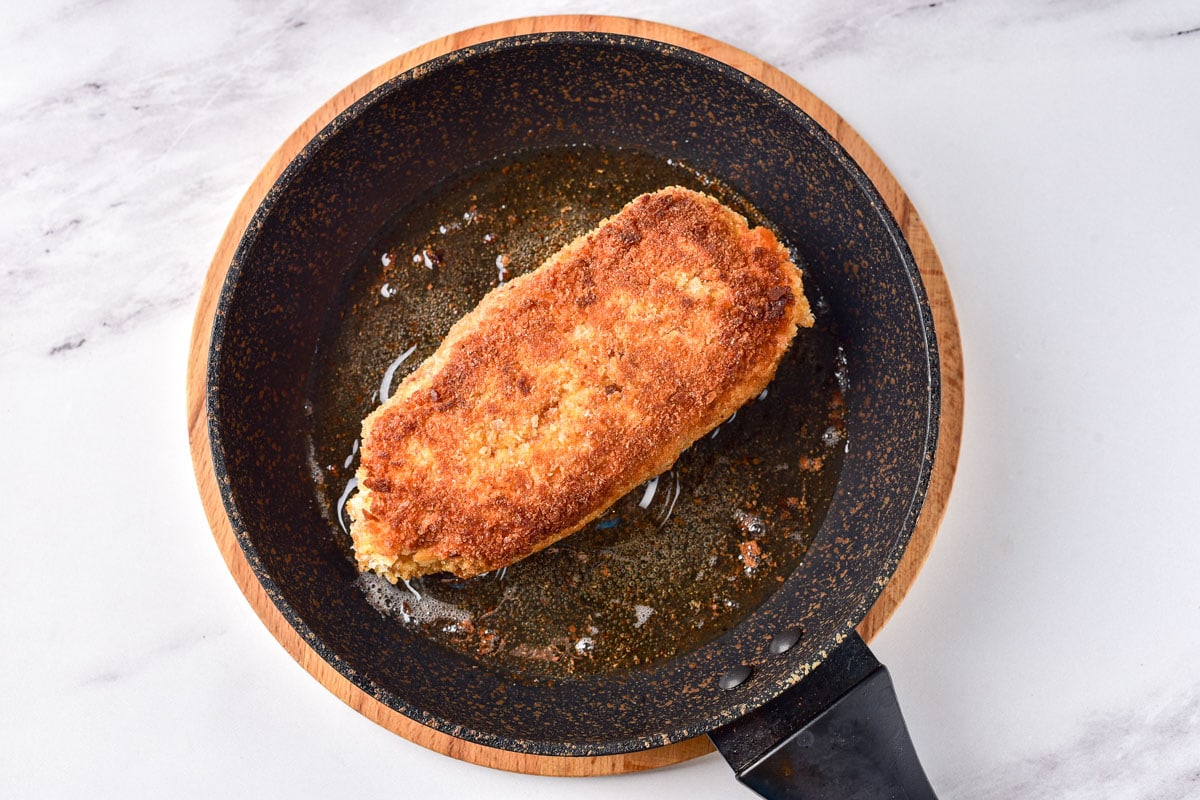
Pour oil in a frying pan. When hot, add the chicken and fry on both sides for 3 minutes over medium heat.
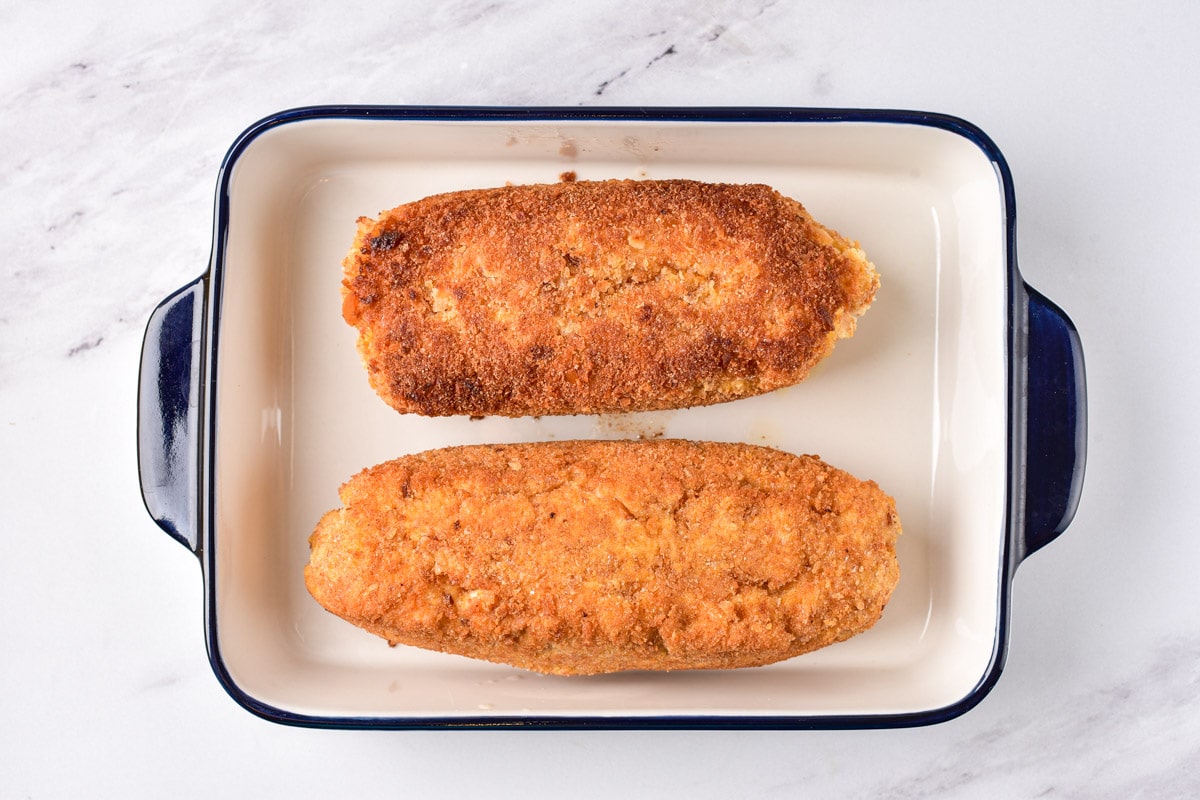
Then place the cutlets in a baking dish and cover with foil. Bake in the oven for 15 minutes until fully cooked. The chicken should reach an internal temperature of 165 degrees Fahrenheit.
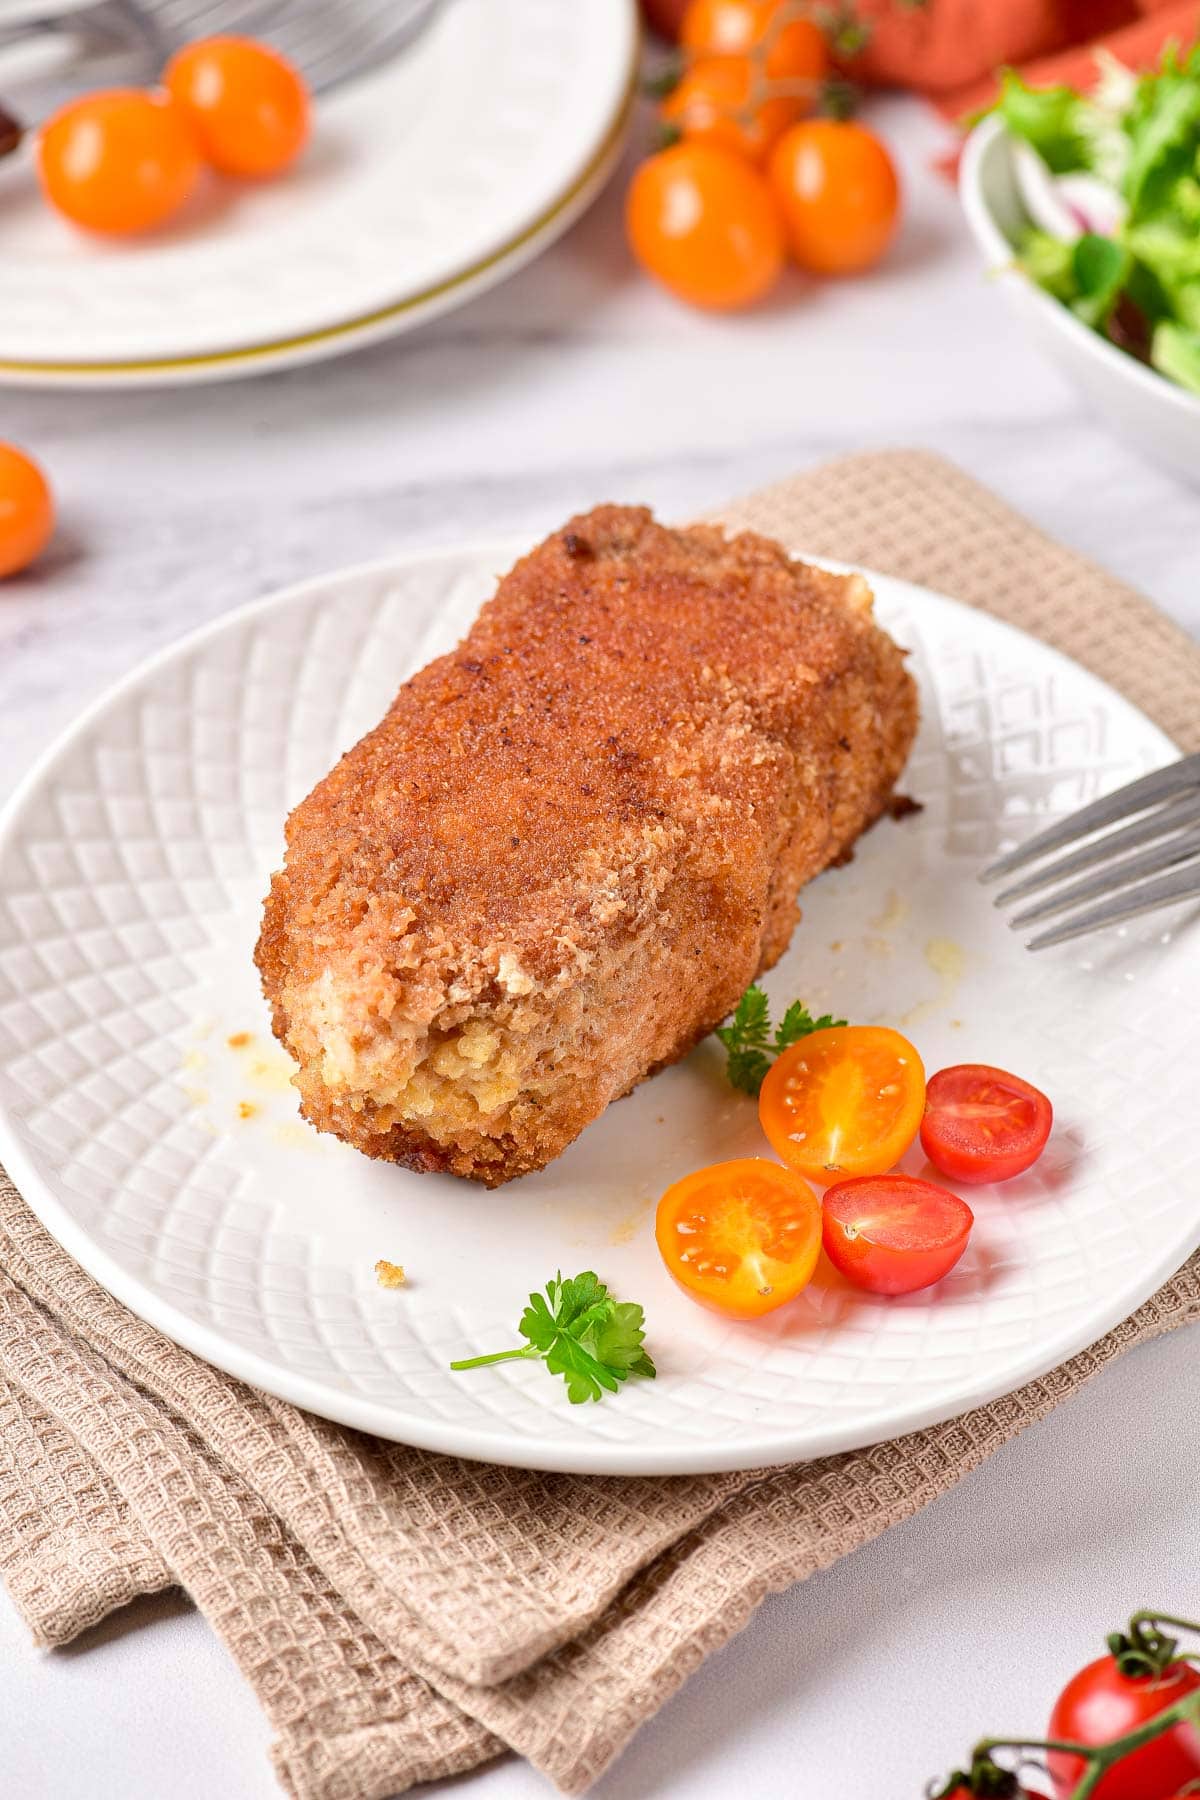
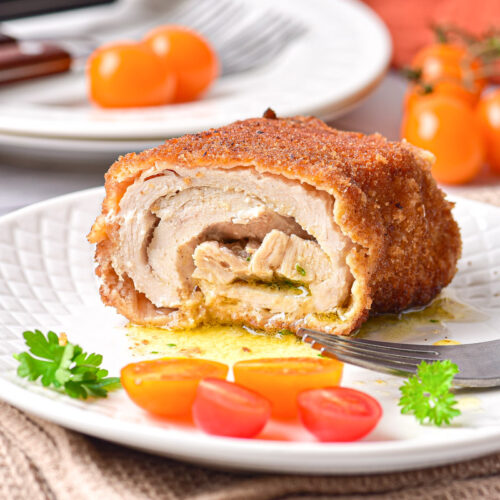
Remove the baking dish from the oven and let the chicken rest for a couple of minutes. Then serve immediately while the butter inside is still melted.
This will allow the herb and garlic butter to spread as you cut into the chicken kiev, making it even more delicious and appetizing. Enjoy!
Storage Tips
If you have leftovers, you can store them in a sealed container in the fridge for up to 3 days. Alternatively, you can wrap them tightly in plastic wrap or aluminum foil before refrigerating.
You can also freeze the uncooked chicken kiev in a freezer-safe container for up to 3 months.
You can then either cook the chicken kiev from frozen in the oven or the air fryer (spray the breading with some oil spray first).
As for reheating, you can reheat leftovers in the oven but it may take a while.
The air fryer may be better and faster option for keeping the crispiness of the outer breading and for efficiency if you’re only reheating one or two.
The microwave will soften the breading, so we wouldn’t recommend it.
FAQ
Here are some answers to frequently asked questions about this legendary dish!
Chicken kiev – also known as Chicken kyiv – is a popular dish made from chicken breast that is pounded thin, stuffed with a mixture of butter, garlic, and herbs, then rolled, breaded, fried and baked. It is popular worldwide with associations to Russian and Ukrainian cuisine.
Chicken kiev likely originated in the former Soviet Union and there is little doubt that the recipe was influenced by French cuisine. However, there are many disputed stories about the exact time, place, and person of origin.
Chicken kiev is generally considered to be stuffed with a garlic-butter mixture (fresh or powdered garlic is acceptable). However, in some places, stuffing with just butter is sufficient to be called Chicken kiev.
To make chicken kiev, pound the chicken breast thin, then place the garlic-herb-butter inside. Roll the raw chicken around itself, then bread it, and fry until golden brown. Bake the chicken until cooked through and then serve hot.
This classic meat dish can be served with potatoes (fried, mashed, or otherwise), a side of roasted vegetables such as carrots or zucchini, and/or a green salad to provide elements of freshness.
Related Recipes
If you enjoyed this recipe, here are some other classic recipes – some popular, some lesser-known – from this region that you might also enjoy!
- Classic Borscht
- Deruny (Potato Pancakes)
- Beef Stroganoff
- Grechanyky (Buckwheat-Meat Patties)
- Kruchenyky (Meat Rolls with Mushrooms)
- Varenyky (Ukrainian Dumplings)
Chicken Kiev
Ingredients
- 2 chicken breasts, skinless, boneless
- 3 tablespoons butter, soft
- 4-5 sprigs parsley, chopped
- 1/3 teaspoon garlic powder
- 1/3 teaspoon salt
- 1/4 teaspoon black pepper
- 1 egg, beaten
- 5 tablespoons all-purpose flour
- 5 tablespoons breadcrumbs
- 1/3 cup frying oil
Instructions
- Preheat the oven to 375 degrees Fahrenheit.
- Using a sharp knife, fillet the chicken breasts (slice it horizontally into two even pieces). Don't cut all the way through, as you want to be able to "fold it open". Cut off a small piece of the end of the flattened breasts to use to cover the butter later.2 chicken breasts
- Place the sliced chicken breasts on a cutting board and cover with plastic wrap. Gently pound each piece of chicken with a meat mallet to flatten further.
- In a bowl, mix the softened butter with the chopped parsley and garlic. Shape the butter into a small block.3 tablespoons butter, 4-5 sprigs parsley, 1/3 teaspoon garlic powder
- Salt and pepper the chicken fillet. Place half of the butter on the edge of each pounded chicken breast. Then place the small pieces of chicken that you cut off earlier on top of the butter.1/3 teaspoon salt, 1/4 teaspoon black pepper
- Roll up the flattened chicken breasts tightly, starting on the side with the butter, tucking in the edges as you roll. Secure with skewers if necessary.
- Pour breadcrumbs into one bowl, flour into another, and the beaten egg into a third.5 tablespoons all-purpose flour, 5 tablespoons breadcrumbs, 1 egg
- Dredge the chicken in the flour, then dip it in the beaten eggs. Roll the chicken in flour and egg again, then roll it around in the breadcrumbs until completely coated.
- Pour cooking oil in a frying pan. When hot, add the chicken and fry on both sides for 3 minutes over medium heat.1/3 cup frying oil
- Transfer the cutlets to a baking dish and cover with foil. Bake in the oven for 15 minutes until fully cooked. The chicken should reach an internal temperature of 165 degrees Fahrenheit.
- Remove the baking dish from the oven and let the chicken rest for a couple of minutes. Then serve immediately while the butter inside is still melted. Enjoy!
Notes
- You can use store-bought breadcrumbs, but homemade breadcrumbs are worth it because they are fresh and don’t contain additional seasoning.
- You can make the butter with herbs and garlic ahead of time and freeze it or store it in the fridge for a couple of days. It’s easier to roll the chicken when the butter is hard.
- Instead of granulated garlic or garlic powder, you can add fresh minced garlic to the butter instead.
- Pound the chicken to a uniform thickness to ensure even cooking. Be gentle, you don’t want to pound holes in the chicken.
Nutrition
This nutritional information has been estimated by an online nutrition calculator. It should only be seen as a rough calculation and not a replacement for professional dietary advice.

Checked out your page to see what’s up with wrapping the butter in fillets – found out I need to cut them super duper thin and then it’s easy. Love this dish, yet American cafeteria never carry them, unlike in mother Russia. By the way, nobody calls this dish in French in Russian, it is known as kotleta po-kievski. Or is it kyivski?
I’m from Kyiv and absolutely adore Chicken Kyiv.
Seeing your recipe reminded me of how long it’s been since I last cooked my favorite dish—this needs to be fixed right away!
By the way, in Kyiv, when preparing the butter filling, it’s first frozen into small sticks and then placed in the center of the chicken cutlet. This way, the butter only begins to melt at the very last moment. As a result, it’s guaranteed not to leak out during cooking and ensures that perfect effect of aromatic melted butter flowing out when the cutlet is cut.